Several years ago I made a 3D printed lamp for my son using guts from a WIFI controlled RGB LED bulb. The lamp had a large 3D printed fractal vase. He recently reported that the electronics had failed and asked if I'd make him another lamp. Sure!
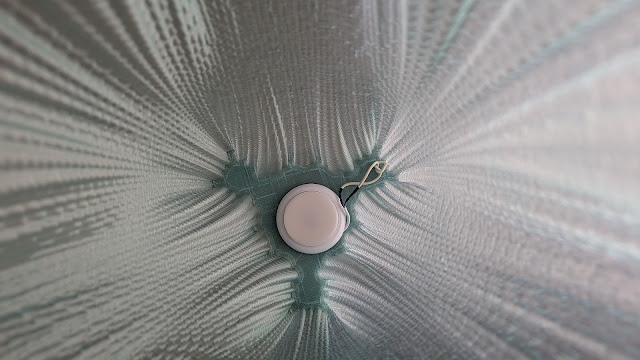
I designed a new vase using a 3rd order Julia set with swept parameters. About 600 fractal images were generated using ChaosPro. The images were imported into ImageJ where they were stacked and converted to a solid and exported as an STL file. I sliced it using Cura's vase mode (did they ever fix vase mode in Prusa Slicer?) and printed it on UMMD. The top and bottom of the vase are the exact same tri-lobe shape, but rotated 60 degrees. At the middle layer the outline of the vase is almost a perfect circle. The vase has a very interesting surface texture that results from the limited resolution of the math used to generate the fractal shapes.
The new vase is 638 mm tall, printed in about 13 hours using 930 g of Keene Village Plastic's Edge Glow Glass PETG filament with 1 mm walls, and 0.25 mm layer thickness.
The Edge Glow Glass filament is a transparent filament with some "bluing" added to make it look like glass under normal lighting conditions. But if you light it with blue light, the material fluoresces a very cool looking pale blue color.
 |
| This is what it looks like in daylight. The bluish color that makes it look like glass comes from some dye that's added to the filament. |
In the original lamp, I took apart a normal shaped LED bulb so I could put the LEDs as close to the bottom of the vase as possible. That required making a very odd shaped heat sink to mount the LEDs on. Since I made that first lamp for my son, LED bulbs have become cheaper, much more widely available, and in many different configurations. For the new lamp, I used a WIFI controlled GX-53 RGBW LED bulb and didn't need to take it apart as it is pretty flat and sits very close to the bottom of the vase. I just bought a socket for the bulb and installed it.
The only way to get "white" light from the old lamp was to turn on all the R,G, and B LEDs and the color temperature that resulted wasn't very nice. You could tweak it a little by adjusting the relative brightness of the LED colors, but it never produced a pleasing white light. The new bulb is an RGBW type that includes warm and cool white LEDs and the control app allows you to set the color temperature anywhere between a warm yellowish light to a cool bluish white.
I like to set the bulb to a purple color. That turns on red and blue LEDs. The blue light makes the vase fluoresce the beautiful pale blue color and the red light shines through and looks pink through the glowing blue vase. It's a very nice effect that's not fully captured by the camera. The blue light also makes nearby fluorescent objects glow nicely, too.
 |
| The new lamp, set to purple light, making its own vase glow blue and the one next to it glow green. There are no glass pebbles in the bottom of the vase in this photo. |
Wiring couldn't be simpler. I drilled a hole in the side of the vase near the bottom, fed in an 18 gauge line cord, split the end of the cord and tied it in a knot so it couldn't pull out of the lamp, stripped the ends of the wires, and soldered them to the wires from the lamp socket, then used shrink tubing to cover the solder joints. Finally, I put some hot-melt glue on the bottom of the lamp socket and mounted it in the bottom of the vase. Done!
The vase is large, tall, and relatively light weight so it can be moved or knocked over pretty easily. I added a few lbs of glass pebbles to the bottom of the vase to help keep it stable. I haven't decided if I'm going to epoxy them in or just leave them loose.
 |
| Surface texture results from the low resolution math that generates the fractal shapes that get stacked to make the vase. The print came out with a very shiny surface- like glass. |
The nice thing about this lamp, unlike the original, is that if the bulb ever fails the dead one can be easily replaced - assuming they are still available. GX-53 bulbs are commonly used for under-cabinet lighting, so I think they'll be around for a while.
I added some rubber "feet" to the bottom of the vase to make it less likely to slide if bumped. These feet are some soft silicone material that is sticky on one side but not the other. The stickiness comes from the plastic, not an adhesive, and they don't leave any residue if you peel them off. They also don't seem to damage the finish on furniture. If they get dirty and "unsticky", just wash them off and they're sticky again.
 |
| Rubber feet on the bottom of the lamp. |

No comments:
Post a Comment
Leave comments or a questions here and I'll try to post a response as soon as I can.