Showing posts with label bicycle. Show all posts

Sunday, December 29, 2024

A New Bike: Priority 600X

Note: I wrote most of this post back in April, but never got around to posting it. I believe Priority no longer sells this specific model of bike, though they sell others using the Pinion gearbox.


I've been commuting back and forth to work on my Priority Continuum Onyx (referred to as PCO from here on) for about 3 years and it has been wonderful! The sealed Enviolo CVT in the rear hub and the Gates belt drive have been absolutely perfect. But time marches on... I retired in September last year and no longer need to commute daily, though I still ride the bike around town, even through most of the winter.

The mean streets of Milwaukee are cracked and potholed a lot like I remember Tijuana in the 80s. I decided to get myself a bike with some suspension and fatter tires to make the ride more comfortable. I started watching youtube videos of some of the Priority bikes and was really impressed with the Pinion gearbox bikes. 

The Priority 600X has a Pinion C1.12 gearbox at the cranks instead of the PCOs CVT in the rear wheel. I have always been a bike geek and love to try different transmissions. I saw the Pinion gearbox a few years ago and found it interesting, but most bikes with that gearbox cost $4-5k, often more, and that was a bit too rich for my blood. $3k has always been the far upper limit of what I could see ever spending on a bike.

I don't know if it was coincidence or the result of some artificially intelligent Google surveillance of my viewing habits and interests, but I got an email from Priority Bikes promoting a spring sale. Among others, they were offering an incredible deal on the 600X. The bike normally sells for $3500, but it was $250 off and there was an ordering code that knocked it down another 25%. I couldn't resist! I don't know how they can sell that bike at that price and stay in business. I'm guessing they were getting rid of inventory of this bike prior to selling the newer models.

The Priority 600X is an incredible machine. It has a 110 mm travel Wren suspension fork that is owner-serviceable (unlike the Cannondale headshock in my old MTB). It also has a very low maintenance (oil change every 10k km or once a year) Pinion C1.12 gearbox, a maintenance-free Gates CDX belt drive like the Onyx (CDN), four piston hydraulic brakes, tubeless capable WTB rims and tires. You can see all the details at Priority's site, and a bunch of youtube reviews here.

The bikes 2.4" wide tires and suspension fork mean it will be great on the pot-holed streets and good for off-road riding, as well. The frame is built to have bags and carriers, so it's super versatile.

I also ordered a trailer hitch and bike rack to fit my car. I didn't order a roof rack because the bike is relatively heavy (~32 lbs) and I don't like the idea of having to lift it that high. I also figured that if the bike gets muddy I don't want to try to carry it inside the car, where it will be hard to fit anyway, due to the 29" wheels.

A few people liked my review of the PCO, so after I get through all the other stuff, I'll go into some detail about the bike that you might not find in other reviews. You can skip down to the Bike Details section below if you prefer to skip the other stuff.


Arrival!


The bike arrived 4 days after ordering and within minutes I had it out of the box, preserving it for future shipment via airlines. As usual, the packing was perfect and the bike came out of the box without any damage whatsoever. I took pictures of the way it was packed so that if I ever want to ship the bike via an airline, I will know how to pack it up so it arrives undamaged.


It's here!  It's here!


This is how it gets packed for shipping. No damage at all!


The usual goodies: pedals, shock pump, touchup paint, bash guards for shock, tools, and manuals.


Here it is, about a 1/2 hour later, fully assembled!

My bike came equipped with Tektro Orion 4P brakes, Goodyear Peak 29 x 2.4" TC tires on WTB KOM Tough i35 rims, WTB Volt saddle, and Wellgo B087 platform pedals. Note: the tires and rims are tubeless capable, but the bike ships with tubes installed.

When I separated the front wheel from the rest of the bike after taking it out of the box, I was impressed by the size of the wheel and tire. It looks like something that should be very heavy but it was surprisingly light.

Assembly was pretty easy- unwrap everything, mount the pedals, turn the stem around 180 degrees, mount the handlebars, and install the seat. I also checked belt tension, tightness of screws all over the bike, headset tightness, brake caliper to disc alignment, etc.

Next I studied the shock manual and gave it some air as suggested, then took it outside to bed-in the brakes. That involves getting up to speed and then squeezing one of the brake levers until the bike slows to walking speed. At first is squeaks and vibrates, but you speed up and do it again, and again, and again, and eventually the brake starts slowing the bike smoothly and quietly. Then you repeat the whole process for the other brake. Fortunately, I live on a relatively steep hill and the getting up to speed part was super easy.


The Pinion C1.12 Transmission

The ride back up the hill gave me a chance to test the low end gears of the of the Pinion transmission. I was impressed! The lowest gear seems like you could ride the bike up a tree if you wanted to. I was used to shifting the Enviolo CVT on the Onyx, and shifting the Pinion gearbox was similar. I found that shifting required a little more muscle than I had expected, but I was wearing heavy winter gloves, so maybe the gloves were forcing me to grip the shifter harder. It may also be the tension on the shift cables is a bit higher than it needs to be. That can be adjusted, but I'll wait until I've ridden the bike a while to give the cables time to stretch. 

Gear shifts were instant, but you have to time your pedaling pressure a bit when shifting so you're not putting too much of a load on the gearbox during the shift (like the Enviolo hub in the Onyx). You don't have to stop pedaling, just reduce pressure momentarily. The shifter clicks at each gear position, so as soon as you feel /hear the click you can start mashing the pedals hard again. To me it seems like it's easier to shift down than up because you don't have to time the shift to your pedal stroke as much- the gearbox seems to tolerate more pedal pressure when downshifting. Rotating the shifter forward increases the gear ratio, rotating back reduces it for climbing. You can shift through the entire gear range while stopped.

I remember the old Sturmey-Archer 3-speed hubs I rode as a kid. If you worked the shifter carefully, you could put the thing between gears and the pedals would just turn without moving the bike. I tried to do the same thing with the Pinion gearbox and could not get it to do it, so you probably don't have to worry about shifting and having the pedals suddenly go limp while you're barreling down single track on rocks or roots, or worse, while pedaling a heavy load up a steep hill.


Wren Inverted Shock Fork

I played with the shock settings a bit and found it very responsive. There are so many adjustments you can make it will take me a while and some off-road riding to set it up just right. My old Cannondale with a headshock, and the only adjustments were the air pressure and damping. The Wren shock has a lockout for street riding, though with the potholes we have in Milwaukee, I may leave the shock active most of the time.

I've been riding it for months now, and find that I have to top-up the pressure in the shock every couple weeks to keep it working consistently.


Lights and Reflectors

Since I'll be riding around town on the bike, and frequently at night, I did my usual thing and put reflective tape on the wheel rims after I peeled off all the WTB stickers and wiped the rims with IPA. I used blue, fluorescent yellow, red, and white reflective tape randomly arranged between the spokes on the rims. I'll probably add more reflective tape to the cranks and head tube.


I also bought a bright headlight that has a large battery and a "smart" taillight that senses when you're braking and lights up at maximum brightness like a car's brake lights.


Headlight and Wahoo GPS/computer. I made the headlight mount from a piece of aluminum angle stock.


Here's The Hitch

I want to be able to transport the bike easily so I shopped for hitch receivers that would fit my car. Draw-Tite and Curt seem to be the most popular brands on amazon.com, both getting many good reviews. I don't want the bike and rack bouncing and swaying around so I chose the Curt 11473 over the Draw-Tite 24944 after studying pictures of the two. The Curt hitch seemed to be the more sturdily built of the two. I also bought a hitch tightener. 

The hitch arrived on the same day as the bike and I took it to the Milwaukee Makerspace to install it. Three hours later it was finished, with most of that time spent dealing with the little plastic fasteners used to hold all the splash guards and the lower bumper cover (the black part) in place. I managed to put it all back together without any leftover parts, and the sensors on the rear bumper still work!

The hitch is solid as a rock!


Bike Carrier

I ordered a bike carrier, too, and went cheap. Big mistake. The carrier I ordered hangs two bikes by their top tubes. It can tilt back to allow access to the back of the car, which seemed like a good idea. There are two main problems with this rack. First, the top tube on my bike is tilted which means the bike hangs on the carrier tilted, putting the front wheel about 7" off the ground. That's a bit too close for comfort. Second, the hinged joint that allows the rack to tilt out of the way of the hatch wobbles. There's no easy way to stabilize it. Ugh. It turns out the rear hatch clears the bike carrier and bike without tilting, so maybe that feature wasn't that important.


The wrong bike carrier. Maybe it would have worked OK if I had hung the front end of the bike by the fork/downtube joint, but it was a bit too wobbly, even with a hitch tightener in place.

I returned the carrier and ordered another- a Swagman "platform" type that holds the bike's wheels and has a clamp that comes down over the top tube. Much better! It can hold two bikes, and I set it up so my bike goes on the back side of the carrier. That leaves enough room to open the car's hatch, even when the bike is on the carrier. If there's a second bike on the carrier, that may not work so well.


The bike and Swagman XTC 2 platform carrier on the car. Both wheels are now about 14" off the ground. The bike is 75" long and the car is 69" wide, so the wheels stick out a bit on either side of the car. The center clamp that comes down on the top tube is supposed to be located at the top-tube/seat-tube junction, but that would require shifting the bike about a foot to the left and leave the front wheel sticking out, far beyond the side of the car, just waiting to bang into something. The bike is completely constrained as shown, so it's not going anywhere.


The Swagman platform carrier folded up. 


Another view of the bike carrier mounted on the car. The central post can be folded down so it doesn't block the back-up camera when there are no bikes on the carrier, but then you have to leave the wheel trays down as shown.


I added a hitch tightener to minimize wobble and sway- but there wasn't much to start with, so maybe this isn't really needed. The bolt at the left is the hitch pin that comes with the bike carrier and threads into an insert in the carrier that holds it tightly- the hitch tightener might not be necessary. I'll probably use it anyway because it will be one more thing that a potential thief will have to deal with and it might slow them down a little.


Another view of the hitch tightener. That's a 1/2" stainless U bolt. One 19mm or 3/4" wrench can be used to tighten bolts on the hitch and the tightener. You can also see the cotter pin that comes with the bike carrier.

I have a bunch of tools, but didn't have a socket deep enough for the bolts on the hitch tightener, so I ordered a ratcheting wrench specifically for the purpose. I'll just keep it in the car with other loose parts for the bike carrier so I'll always know where it is when I need it.

When you travel with a bike on a car carrier, you're going to have to stop to eat now and then. How do you ensure the security of the bike(s)? I ordered a locking hitch pin that comes with a steel cable. No, it isn't super high security, but it will stop someone from simply walking up and taking a bike off the carrier. When you put the bike(s) on the carrier, you loop the steel cable through the wheels and frame(s) and anchor the end of the cable on the hitch pin. It's a little difficult to get at, but it's better than no security at all. My bike only has to be a little more difficult to take than the one on that other car, over there. Of course, if someone is prepared to cut the cable they will make quick work of stealing the bike.


New Bike, New Other Stuff


Sometimes, the best part about getting a new bike is getting all the other stuff to go with it.


Top tube junk carrier. It's big enough to fit my Pixel 7 Pro phone, still in its case. There's plenty of room for glasses, ear buds, wallet, keys, snacks, etc.- you know, all the stuff you need to carry that they don't put pockets in bike clothes for. Over the several months I've been using it, the velcro that holds the phone in place has become very weak. I don't recommend this bag.


The Enfitnix Cube tail light, with auto on/off and brake light functions, mounted on the seat post. It also comes with a mount for the seat rails, but I didn't have room for it there. The light twists on and off the mount, so it's easy to take inside to charge (or to steal!). The battery is supposed to last between 4 and 14 hours, depending on how you set it. The button that turns it on and sets operating mode is a little too easy to push. I paid about $22 via amazon.com, but you can buy similar lights via aliexpress for about $5.
 

Fenders


I'm going to be riding the 600X around town (I sold my beloved PCO via Craig's List) in addition to off-road, regardless of the weather, within reasonable limits. That means fenders are a must. The problem is fenders made for MTBs are mostly intended to protect shocks, bearings, and the rider's face from mud thrown up off the trail and tend to be very short so they won't get caught on branches.

The 600X's inverted Wren fork makes it difficult to fit a front fender. Most forks have a bridge just above the wheel that moves up and down with the wheel and makes a great attachment point for a fender that follows the motion of the wheel as the shock compresses. MTB fenders are usually designed to attach to the fork's bridge. The Wren fork on the 600X has no such bridge, so the only attachment points for a fender are the upper stanchions. If you want the fender close to the tire, it has to attach to the lowers that move up and down with the wheel as the fork compresses. The problem with that is the fender has to be about 15" away from the axle and you need something that long to support it. You can mount a fender using the upper stanchions but it won't follow vertical motion of the wheel. OTOH, if you're riding on streets, you can lock out the fork and mount the fender low enough on the upper stanchions to put the fender close to the wheel.

A fender for the 600X rear wheel isn't too big a problem because unlike the front wheel, nothing moves up and down, so attaching it to the seat stays should be fine.

After a lot of searching, I found the Mucky Nutz fenders to be the most likely to provide most of the coverage I wanted to keep my clothes clean when riding on wet streets. I ordered them via ebay.


Mucky Nutz rear fender on the bike. It's plenty long at the back, but a bit short at the front end. I may have to figure out how to add an extension to get more coverage toward the front. The fender is held in place with velcro straps that come with it, so it's easy to put the fender on in wet weather and take it off in drier weather.


Mucky Nutz fender on the front wheel. I wish it were longer at the back- I may need to figure out how to extend it. Velcro straps secure it to the upper stanchions. I can keep it close to the tire as long as I lock out the fork so the wheel doesn't move up and down. 


The fork has no bridge to secure the front fender and it seemed a little too wobbly just strapped to the stanchions, so I designed and printed a bridge specifically to hold the fender. It friction fits over the upper stanchions, gripping them tightly, and Velcro tape secures the fender to the bridge. It greatly increases the stability of the fender.


Mucky Nutz fender mounted on the front wheel with 3D printed bridge. I printed it with black TPU filament. It grips the two stanchions tightly without any retaining straps, and improves stability of the fender. We'll see how it holds up when exposed to weather. 


Closeup of the 3D printed bridge. The fender has slots for the Velcro straps that secure it to my printed bridge.


CAD render of the bridge. The holes for Velcro straps match the holes in the fender. It took about 20 minutes to design it and I only had to print two versions to get the dimensions right. Printing with a 1mm nozzle in 0.5mm layers at 30 mm/sec took about 1 1/2 hours. Everything you see is 5mm thick.


It takes just a minute or two to attach the fenders, so when the weather is bad I'll put them on and when the weather is nice they're coming off.


Tubeless? Tubes?


I watched a lot of YouTube videos about running tubeless tires on MTBs. Under some circumstances it seems like a really good idea, (riding in areas with lots of thorns, etc.) but otherwise the maintenance seems troublesome. I'll probably use tubes for the foreseeable future.

I picked up a couple spare tubes - I got TPU tubes that are super thin and light. You can buy a 2-pack of 29" Cyclami tubes via amazon.com for $26, or buy the same package via aliexpress for $10. Guess which I did. On-line reviews indicate that they are lighter, harder to puncture, retain air better than butyl tubes, and are difficult to patch reliably. I chose the Cyclami tubes because they have threaded metal stems- a lot of the TPU tubes have plastic stems that can break, and won't work with screw-on pump connectors.


One of two Cyclami TPU tubes ordered for $10 from AliExpress. That's a 29" tube and only 62 g! Very small and easy to carry on the bike. I bought two tubes and they came with some cleaning wipes and a couple patches (regular bike tube patches won't work with TPU tubes). I chose these tubes for their threaded metal stems- most TPU tubes have plastic stems to reduce weight, but that makes them incompatible with a screw-on pumps, and plastic stems can break. Note: the valve cores of these tubes are not removable, so I probably won't be putting any sealer in these tubes.


One of the butyl rubber tube that came in the wheels. 4X heavier than the TPU tube! That's almost an extra half pound in each wheel that you have to spin. Yikes!


Size comparison. Which would you rather carry as a spare? You can carry 4 of the TPU spares in the space (and weight) of one butyl tube.


When I received the TPU tubes, I immediately set about replacing the butyl rubber tubes that came on the bike. That presented a new problem: how do you get the tires off the rims? Tubeless capable wheels and tires require a very tight fit and I found that I couldn't get a tire lever between the tire and rim no matter how hard I tried. Back to YouTube to search for the answer. The trick is to lay the wheel down with the tire deflated, then step on the tire with your shoes to force it in toward the center of the rim. Once you get it started, it's pretty easy to get the rest of it to go. Once the bead is all pushed into the center of the rim, you can grab it in one spot and pull it over the rim. Then you can pull the tube out and stuff the new one in. 

I started this post in April, and now it's December. I've had one flat tire caused by a piece of glass. I patched the TPU tube per the instructions and found that it was flat again a day later. I opened the wheel up and inspected the patch and found it wasn't entirely stuck to the tube. I applied some localized pressure to it for a couple minutes and put it back and it's been holding air for about 3 months now.

One claim about TPU tubes is that they leak less air than butyl tubes. I haven't found that to be the case. They seem about the same to me and I find myself topping up the tire pressure every few days. I typically run the tires at 40 psi on the streets.


Pump


I got a small pump to carry on the bike for just-in-case. It's a Crank Bros Klic HV pump. It's a great design that includes a flexible hose, valve adapter, pressure gauge, and CO2 cartridge fitting in case I don't feel like pumping (but don't use CO2 with TPU tubes!).


The Crank Bros Klic HV pump. It's 260mm long and about 30 mm in diameter. It comes with a mount that bolts on the bike. When it's closed up like this everything is sort-of protected from mud and dirt. It contains a flexible hose with screw-on adapter for Presta and Shrader valves, a pressure gauge, and a CO2 adapter so you can inflate your tires that way (don't use CO2 with TPU tubes!). It takes 300 strokes (I counted!) to fill a 29x2.4" tire to 35 psi with this type of pump, so I hope I don't get many flat tires.


Pedals


The bike came with Wellgo B087 pedals as did the PCO. I took one of the Wellgo pedals off the bike and tried to open it to see what the bearings and seals are like, and found that I didn't have a socket that could get inside the pedal to unscrew the lock nut. Hmmm. 

I bought some very slightly used, large size Crank Bros Stamp 7 pedals via eBay for the 600X. The advantage is that they fit my big feet better, are easily serviceable, and the traction pins are adjustable and replaceable. The one's I got happen to be a metallic blue color that matches some of the parts on the Wren fork. 


Stamp 7 pedal in metallic blue.


The new pedals match the fork air cap and lockout lever!


Rack/Bag


When I ordered the bike I ordered the same Axiom rack I had on the PCO. I also did some research on pannier bags and found one I liked- a Rhinowalk knock-off of an expensive Ortlieb bag. It is water tight (well, rain proof- not sure about getting it wetter than that) and can carry a lot of stuff. It goes on and off the rack quickly and easily.


Heavy duty rack, the same one I used on the PCO, fits over the rear fender, no problem.


Bag on the rack. I have tested this bag in pouring rain. Not a drop got inside.

I had one small problem with the bag. It uses a similar clamp system to the Ortilieb bag it copies, that has clamps that slide along a rail to allow you to space the clamps to fit your rack. I found that the clamps moved easily when I pulled up on the strap that releases them to take the bag off the bike. I fixed that with a couple drops of super glue.


Bike Details


The bike's frame has internal cable routing for a dropper seat-post. It also has a quick release seat post clamp that I'll probably replace with one that requires a tool so my seat is less likely to get stolen. The seat post diameter is 30.8 mm.

The large frame that I ordered has cranks that are 170 mm long. The ground clearance to the pedals is 130 mm, quite high off the ground compared to a street type bike, meaning that when you're riding on the street you can pedal through turns without worrying about the pedals hitting the ground.


The bike comes with a heavy-duty kick stand that is set far back on the frame. It's far enough back that you can roll the bike backwards while the kick stand is down without the pedals hitting it. I haven't noticed any heel-strike while pedaling. 


The belt drive is Gates CDX type rated for a very wide temperature range. Both the front and rear belt pulleys have 32 teeth. Both are made of stainless steel, and since the tooth counts are the same, I'd expect the two to wear at about the same rate. The 32 tooth crank pulley is pretty small, giving it lots of ground clearance when riding off-road.

The wheels are quick release, with 15 mm through-axles. It appears that the rear hub has a standard freewheel (is that what it's called these days?) so the wheel is dished to make room for it. I would have thought that with the belt drive and a single cog, and a disc brake rotor on the opposite side, there would be no need to dish the wheel, but I guess it doesn't work that way.


More New Stuff


I don't like to wear padded bike shorts (what a ridiculous concept!). The Volt seat that came on the bike is pretty good, but after riding the bike for a few months I wanted to see if I could find something more comfortable. I did some digging and found recommendations for something called an "Infinity" seat. I looked them up. Yikes! $400 for a bike seat! These things are made in LA by a company started by a chiropractor, and used by almost all the Race Across America riders because of the comfort. I checked to see if I could pick one up on eBay and and yes, you can, for about $300, but they go fast. I got an email from Infinity offering 15% off, so I ordered a seat figuring that if I didn't like it, I could always sell it on eBay and only lose $50 in the process.

Most of the infinity seats have a leather cover, but I didn't want to have to worry about taking care of leather if I'm out in rain and snow, so I bought the seat with the "marine vinyl" cover. I am pleased to say that it is every bit as comfortable as the reviews said. So far the longest ride I've done is 25 miles in a day, but the seat is no longer a comfort issue.


Infinity seat and Suntour suspension seat post. There is a neoprene cover over the mechanical bits of the seat post to help keep them dry.

One thing I discovered early on is that you'd better not pick up the rear of the bike by the Infinity seat- it will distort enough for the rails to pop out of the back of seat frame and then you have to use a screw driver to release the front end of the rails, get the back end inserted back into the seat frame, then screw the front down again. I've trained myself to grab the rack when I want to lift the back of the bike instead of the seat, so it's no problem.

The suspension fork does a great job soaking up bumps and potholes on the streets, but rear end of the bike (and my butt) take a bit of abuse when the rear wheel goes over the same bump or into the same pothole. I decided to look into suspension seat posts. After reviewing several YouTube videos about them, I bought a Suntour post for about $100. There are more expensive posts out there, but the reviews didn't really find the extra money worth spending. There are also cheaper seat posts out there from unknown Chinese manufacturers. I didn't want to gamble on one of those.

I'm pleased to report that the Suntour seat post is "all that and a bag of chips!" It is not a shock absorber, just a spring that compresses on the bumps and takes out the bone-jarring that accompanies them. There is a preload adjustment screw that you can set to compensate for your weight. I set it so it doesn't compress when I'm riding normally- it only compresses when I hit a big bump. I weigh 197 lbs and the spring that comes with the seat post is fine. If you weigh much more than that, you can get a stiffer spring (for added $, of course). 

Riding is getting very comfortable between the Infinity seat and the Suntour seat post. Now I have to work on hand/arm comfort a bit...

Thursday, April 25, 2024

Mounting an MTB fender on a Wren inverted fork

Having recently retired, I have been thinking about things I want to do. I've been a bike geek for my entire life, and always wanted to try some long trips including off-road camping, etc., but never had time. Now I have time! I'm starting to have joint pain and other problems that will probably get worse over time, so I decided it's now or never.

I got a great deal on a new Priority 600X hard-tail "adventure" bike. It's an awesome machine that has a Gates belt drive instead of a chain, a Pinion 12 speed gearbox mounted at the bottom bracket, a Wren inverted suspension fork with 110 mm of travel, and Tektro Orion 4 piston hydraulic disc brakes.

When the 600X arrived I didn't have room for two bikes, so I sold my Priority Continuum Onyx. I was sad to see it go- it was a great bike! 

I'll make a thorough post about the 600X soon. 

I will be riding the 600X on Milwaukee's pot-holed streets as well as doing some off-road riding, so I wanted to fit it with fenders (aka mudguards) for wet weather riding. I did a lot of online shopping and review surfing and found the most promising ones to be made by MuckyNutz in the UK. I found a dealer on ebay and ordered a set. 

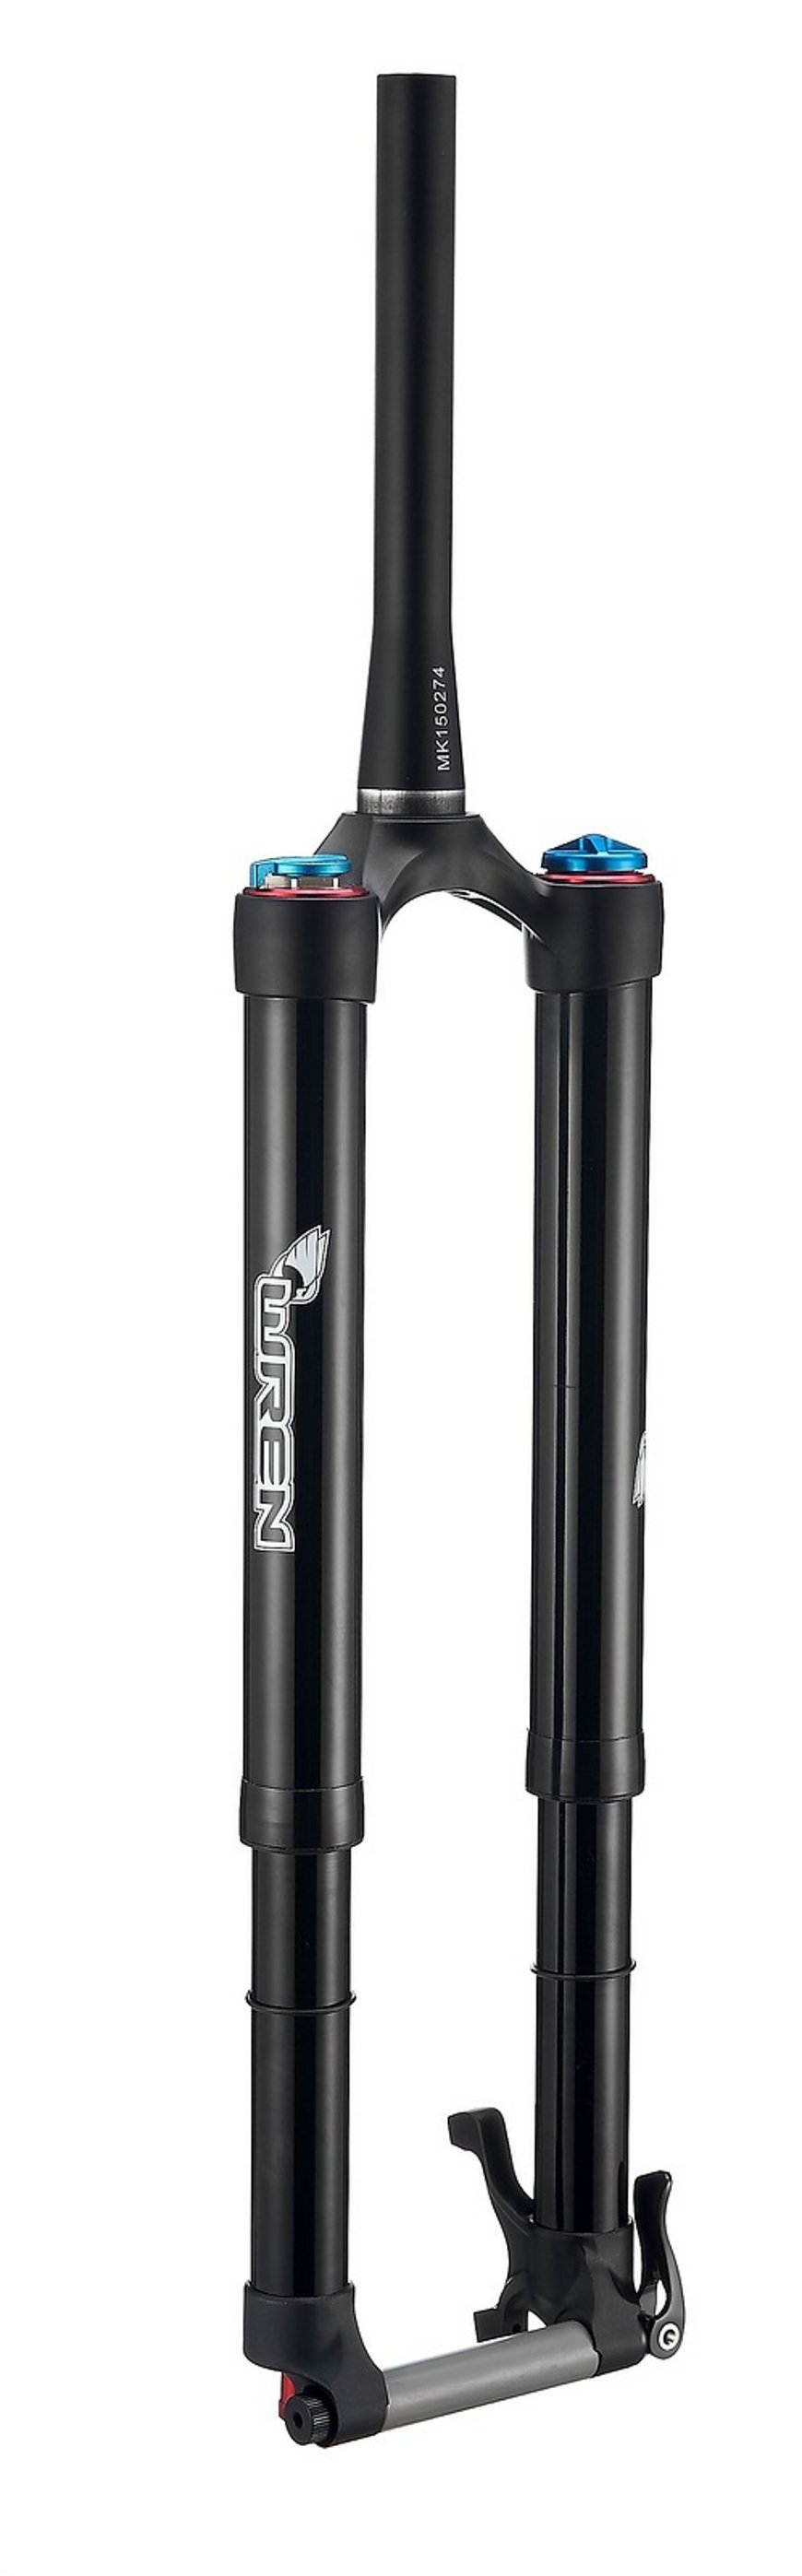
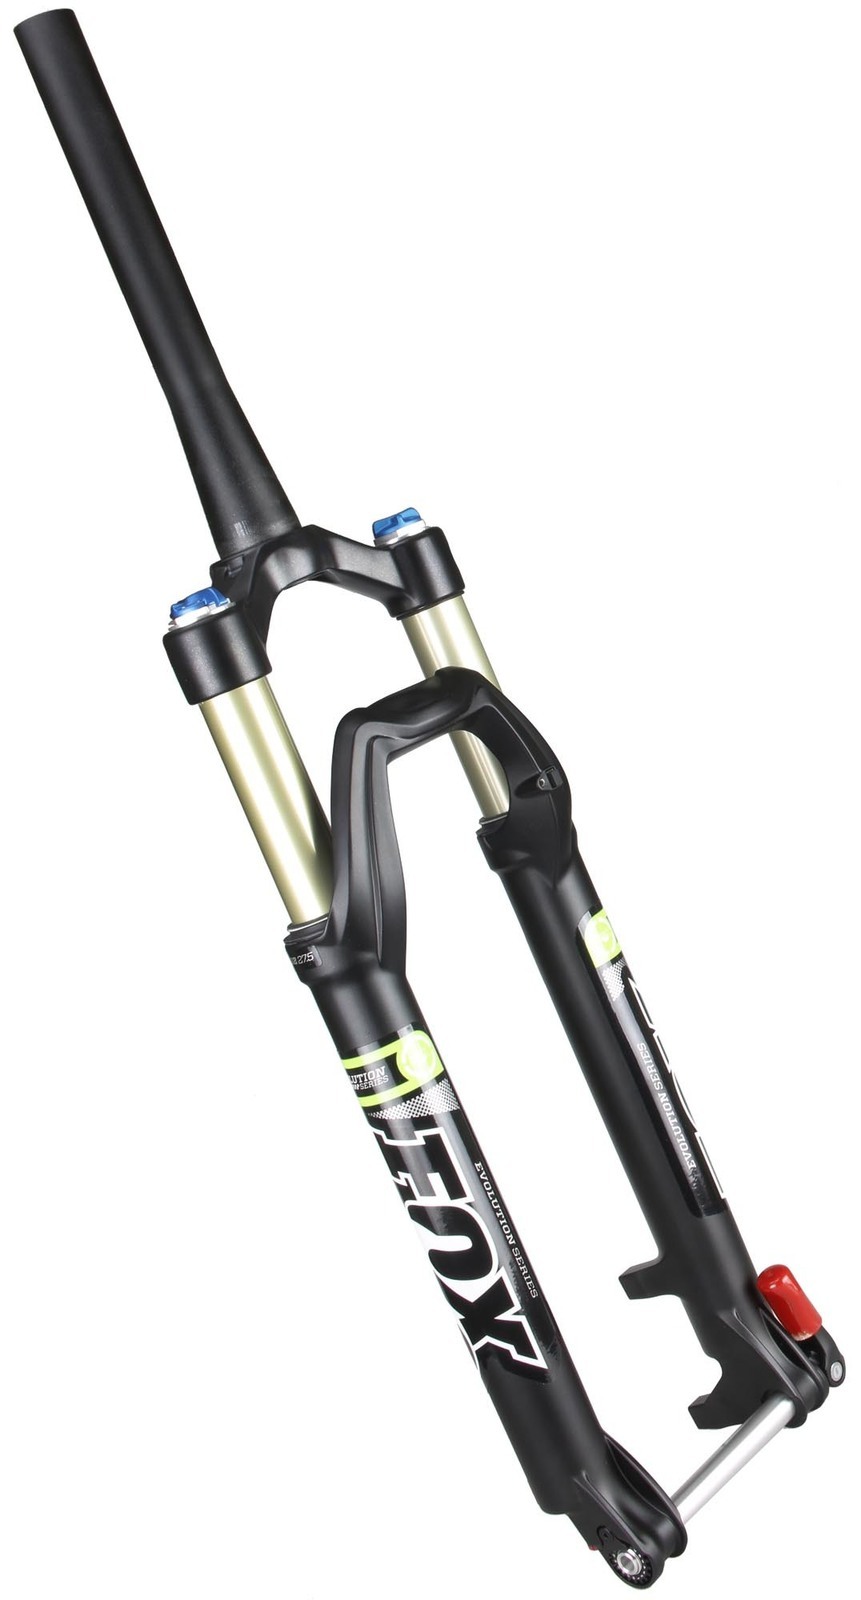
The rear fender fits on the bike just fine. The front fender was a little bit of a problem. MTB front fenders are made to attach to the fork lowers and bridge. The Wren fork is inverted - the lowers slide into the stanchions instead of sliding over them- so it doesn't have a bridge. There wasn't enough room to mount the fender on the lowers, so it has to go on the stanchions and the fender can't move with the wheel as the fork compresses. I tried mounting the fender on the stanchions but it wasn't stable enough- it really needs a bridge to stabilize it. 

The Wren "inverted" fork. The "lowers" slide into the stanchions and there is no bridge.


Typical MTB fork. The "lowers" have a bridge connecting them together and they slide over the stanchions. The bridge is a convenient place to mount a fender, light, etc. 


Almost every problem, both personal and scientific, can be solved with a 3D printer, including this one. I spent a few minutes measuring the fork and the fender and designed a 3D printable bridge. It fits the stanchions tightly without requiring any additional clamps. I printed it with TPU and tried it out. Perfect!


The fender attached to the fork stanchions with velcro tape. It was very wobbly.  The slots in the top of the fender are for using velcro tape to stabilize the fender on this fork's nonexistent bridge.


The fender mounted with the 3D printed bridge. Very stable! The fender can be installed and removed in just a couple minutes without tools.


The 3D printed bridge. I used black TPU filament. It fits the stanchions tightly and stays put without any additional clamps or tape.

The fender is mounted on the stanchions that do not move with the wheel when the fork compresses. That means it has to be mounted pretty far above the wheel so the wheel won't hit it when the fork compresses, or for street riding, mount it close to the wheel and lock out the suspension. There's plenty of room along the stanchions for either use.

If you have a Wren fork and want to add fenders, you can download the STL file for the bridge here.

Friday, May 12, 2023

Bicycle Disc Brake Pad Sanding Tool


Those of you with bikes that have disc brakes know that sooner or later, they are going to start squealing. In my experience, besides being annoying as hell, when they are squealing, they aren't stopping the bike very well, so you really need to stop them from squealing. 

One common maintenance step to relieve squealing is to sand the pads. This can be tricky to do without sanding the skin off your finger tips because the pads are small and thin. I decided to make a tool that would make it easier to sand the pads without hurting my fingers.

The tool is 3D printed, of course, and holds two pads for easy sanding without injury. I designed it to fit the Shimano type pads that fit my bike's brakes, but a similar design should work for any type pad. Just set a sheet of sandpaper on a smooth, flat surface, set the pads on the sand paper, position the tool over them, and have at it. The pads fit into 2.5 mm deep recesses and are held captive in the tool as long as you are applying downward pressure on the tool.

It was about a 10 minute design in Fusion360. First I modeled one of the pads, measuring everything to within 0.1 mm using a caliper. Then I created the tool:


The tool, printed in PETG, 1 mm line width, 0.5 mm layers, 25% triangular infill. It took about an hour to print at 30mm/sec.

The tool with a couple used, squealy brake pads ready to sand.

The tool and pads after sanding (and a rinse in 91% IPA), ready to go back on the bike and provide a couple more weeks (!) of squeal-free braking.

The CAD file (STEP) is here.


Saturday, March 27, 2021

New Bike: Priority Continuum Onyx


Update 4/30/22

After a year of riding in all kinds of weather, the bottom bracket in my bike started clunking in two spots with each turn of the cranks. It hadn't occurred to me to contact Priority about it, so I took the BB off the bike so I could check the size (68 x 116 mm JIS taper) and start shopping for a new one. It's important to get the right spindle length because it positions the crank pulley in line with the pulley on the rear wheel. The belt drive doesn't like those two to be out of alignment. I was telling a friend about it and he suggested that I contact Priority, so I did and they send me a new bottom bracket, no charge, in a couple days via FedEx. I installed it and now it is perfectly smooth again. Thanks Priority Bicycles!

I've been having some problems with the brakes squealing and I noticed that squeezing the brake levers doesn't feel as solid as it did when the bike was new. Close inspection of the brakes found some oil on the right brake lever, and both levers were pretty squishy. If oil comes out, air goes back in. I did a little research and found a brake bleed kit on amazon that I will be using to clear the air out of the brakes and restore them to their former solid feel and stopping power. I suspect that once the braking force is restored, I may not have so much trouble with squealing.

Here's the brake bleed kit, and some Shimano mineral oil I also ordered. After some review of on-line forums and youtube videos, it seems it is not unusual to have to bleed hydraulic brakes at least annually. I add that to my annual maintenance list.

Gavin, who was helping work through the bottom bracket problem at Priority, asked if I had shot some video when I was having trouble with the bottom bracket. I had already taken it apart by the time I contacted Priority, so no. After I get the brakes properly bled and working again, if they continue to squeal I'll be sure and shoot some video of the problem to help Priority diagnose the problem. I'll be sure to do the same any time I have an issue I can't diagnose in the future.

The Enviolo hub and shifter has been absolutely perfect over the entire year I've been riding it. I really like it and everyone who has tried riding my bike likes it, too. The head and tail lights and hub generator have worked perfectly, too.


Update 7/19/21:

I've been riding the bike daily on my commute to work and occasional trips to the makerspace for almost 4 months. The only issue I have is that the front brake squeals loudly now (a problem easily remedied with some disc brake cleaner- see: https://www.youtube.com/watch?v=08ePb4_C0JA ). I replaced the seat and hand grips with slightly more comfortable ones, otherwise the bike is as it arrived from Priority. It has been 100% reliable and has required no maintenance, other than addressing the brake squeal. The hub shifts perfectly and the drive belt is smooth and quiet.


Now back to the original post:


I recently moved from a rural/suburban house that was 40 km from the clinic where I work to a loft in a 100+ year old factory building that's just a two km (6 minutes by bike!) from work, so I started commuting by bicycle, even going home for lunch most days. This location is no more than 15 minutes by bike from almost anything and everything you'd ever want to see or do in Milwaukee.

I've been riding a 30 year old Cannondale hybrid bike that someone gave me about 8 years ago for helping them with a project at the Makerspace. The bike is modified from the original 3x8 gear setup- someone installed a Sachs 3 speed hub with a 7 gear cluster on the rear end of the bike and removed one chainring and the front derailleur and shifter. Unfortunately, they also "modified" -i.e. wrecked-  the rear dropouts and the rear wheel axle no longer has a well defined position- it now relies on super tight wheel bolts to hold it in place. That allows the wheel to shift a bit in the dropouts under hard pedaling in low gear which pushes the wheel against one of the brake pads. It doesn't go back until I take a wrench to the wheel bolts and straighten it again, then wait for the next time it shifts. I can usually ride for a few weeks before the wheel shifts in the dropouts, but ugh! 

The rear derailleur looks like it has been bashed a few times and can't be straightened out or adjusted to work reliably any more. The bike just wasn't worth the expense to fix all the problems.

I still have the CF recumbent bike I built 15 years ago, but it isn't real practical for urban commuting, especially considering the hill I live on, so it was time to find a more practical commuter. I wear regular clothes when I ride so I wanted to find a belt driven bike that wouldn't get oil all over my pants and would require minimal maintenance. Derailleurs don't work with belt drive, so if you want belt drive and multiple gears, you have to have an internally geared hub (IGH). That limited the choices to just a few bikes, including the Marin Presidio 3, the Priority Continuum Onyx, and few others that I ultimately ruled out as too cheesy, too expensive, or just not what I wanted.

There are different belt drive system makers out there, but the best known quality brand is Gates (the same Gates that makes the belts in my 3D printer). Gates belt drive system is called "Carbon Drive" because the belts are reinforced with carbon fibers. Here's a long, but partial list of bikes that use Gates carbon drive. There are some cheaper, Chinese-made/branded bikes that use belt drive, too, but not the Gates drive that is the standard to which others are compared. A company called Veer makes a belt drive system that can be adapted to work on almost any bike.

The Marin Presidio 3 uses a Shimano Nexus 8D 8-speed IGH that has a pretty good reputation for reliability, requires minimal adjustment or maintenance, and a 306% gear range. It also uses a Gates belt drive. I'd have to add fenders for riding in less than optimal weather, but I could probably steal the Planet Bike fenders off the old Cannondale I've been riding.

The Marin Presidio 3- comes with Shimano Nexus 8D rear hub, Gates CDN belt drive, and Shimano hydraulic disc brakes.


I was ready to order the Presidio 3, but a few calls to bike shops in Milwaukee/Chicago area that are supposed to be Marin dealers left me wondering why no one wanted to take my money. I gave up and went back to my search.

That's when I found the Priority Continuum Onyx (I will refer to it as PCO hereafter). It had everything I wanted - belt drive, IGH, and fenders, and a few things I hadn't really thought about like head and tail lights powered by a dynamo in the front wheel hub, and hydraulic disc brakes! Add a rack (that I ordered with the bike) to the rear end and it looks like the perfect commuter bike.

The Priority Continuum Onyx, supplied with Enviolo CVT rear hub and Gates CDN belt drive system, Promax hydraulic disc brakes, dynamo powered lights, fenders, and kick stand. This photo is from the Priority web site. The kickstand on my bike mounts on the rear wheel stay, not at the bottom bracket as shown here.


The PCO has an Enviolo continuously variable transmission (used to be called NuVinci) that is used in some e-bikes. It provides a 380% gear range- slightly wider range than the Shimano Nexus 8D on the Marin bike. The Enviolo hub doesn't shift in discrete gear ratio steps- it's continuously variable between the minimum and maximum gear ratios. It can be shifted while pedaling under load, while standing still (but as I found out, only through about 1/3 of the total gear range), or while rolling without pedaling. This video explains how it works:


The Enviolo hub is sealed and permanently lubricated, so it is a zero maintenance drive. If you were paying attention to the video, you may have noticed that the guts of the hub are mostly steel- it weighs 2.45 kg (5.4 lbs). That makes it pretty heavy - the whole Continuum Onyx bike weighs in at 31 lbs (including the fenders and pedals), so it's not super light, but not too bad. If you pick it up it definitely feels heavier at the rear end thanks to the Enviolo hub.

Note that the Enviolo hub doesn't have any gears- it uses tilting steel balls and steel input and output rings to achieve the variable drive. In theory the "lubricant" keeps the balls and rings from contacting each other (this is traction drive, not friction drive- there's a difference), so they should / better last a long time. The rear hub comes with a 2 year warranty, so I'm not too concerned about it wearing out.

For those interested in the chain and derailleur vs chain and IGH vs Enviolo/Nuvinci efficiency, there's an interesting article here. The NuVinci//Enviolo hub is the least efficient type tested by about 6% depending on the selected gear ratio, but in the real world it isn't likely to matter. Reliability and reduced maintenance are worth a little extra pedaling effort to me. If I didn't want to expend any effort, I would have ordered an e-bike.


Belt Drive vs Chain Drive

Here's a great video that compares belt and chain drive by someone who knows what he's talking about (remember when that used to matter?):  

Gates has a couple videos on their website comparing chain and belt drive systems. When both are new, the chain is about 0.5% more efficient than a belt drive, but as the chain and belt wear, the belt drive remains almost a efficient as new, and the chain gets much worse.


Order and Wait

I ordered the PCO and Axiom rear cargo rack in January but thanks to excessive demand and delayed shipping due to COVID I had to wait for shipment until the end of February. I was OK with that- it was cold and snowy outside and I wasn't going to be riding in that kind of weather anyway. A couple weeks after I ordered, I received an email explaining that the bike was going to be delayed and would ship by March 15th. I was a little disappointed, but there really was no hurry. 

Shortly after I ordered, the price for new orders went up $100 and shipping was now moved out to the end of May. I'm glad I ordered when I did!

On March 11th I received another email announcing that the bike was shipping and would be delivered by March 16th! Woohoo!  When the bike arrived I set about unpacking it and assembling it. The unpacking takes some effort- they packed it up very well so there would be no damage in shipping. It came out of all the packaging in perfect condition. 


Assembly

The bike came 90% assembled- all I had to do was mount the handlebars, the front brake disc, the front wheel, the seat, the pedals, and the front fender. Assembly was easy- just follow the video on the Priority bikes web site. They supply better than adequate tools to do the job, but of course, I had my own that I preferred so I used them. One thing I haven't seen before is that many of the bolts have torque specs marked right on the bike's frame. Nice! Now I should probably get a better torque wrench...


The tool kit that came with my bike. Left to right: touch-up paint, 8 mm wrench, wire nut(?), 4mm star driver (for the brakes?), 3mm hex key, 4mm hex key, 5 mm hex key, 6 mm hex key, 15 mm wrench and 10 mm wrench.


I put some anti-seize compound on the pedal's threads before mounting so I'll be able to get them off again if they ever need replacement, and used Lock-tite on the screws that mount the rack to ensure they'd stay put.

I had some minor adjustment issues with the front disc brake pads rubbing slightly, but I was able to sort it out with some on-line videos from Priority bikes and Park Tools. The brake owner's manual that I downloaded from the manufacturer's web site said they should be worn-in a little to maximize stopping power and to match the pads to the discs. I followed their procedure to align the calipers to the disc and wear-in the pads and the slight rubbing went away.

The bike has a threadless headset which means that the cap on the steerer tube is used to set the preload on the headset bearings. You loosen the screws on the handlebar stem so it rotates freely on the steerer tube, then tighten the cap screw which pushes the stem down as it pulls the steerer up, loading the headset bearings, and finally tighten the screws on the stem. If the preload is too light, when you lock the front brake and push the bike back and forth in the front-rear directions, you'll feel play in the headset bearings. If it's too tight steering will be stiff. When it's just right, steering will be free and there won't be any play in the headset bearings.

I spent about an hour assembling and testing everything.


Specs

I've seen all the on-line reviews of the PCO and found them lacking certain information I would like to have known before I bought the bike.  I couldn't find any mention of the model of hydraulic brakes - only that they are made by Tektro (the brakes that were on my bike are actually made by Promax). I haven't had a bike with hydraulic disc brakes before, so I'm curious about maintenance and adjustments. I was also curious about the wiring to the lights and how well it's sealed against the weather. I could find no mention of the tooth count on the crank ring or the rear hub belt ring, and not many close up photos that allow them to be counted, which meant I couldn't calculate the exact gear-inch range (does anyone still use that?) that came on the bike. I also wanted to know how the gear ratio range compares to that in my old bike. 

Consider this "review" the one that provides that missing information. If there's any detail you want to know about that you don't see here, ask in the comments below and I'll update this post with photos and measurements as requested. The photos are all from the bike as I received it, but of course, supplied components may change depending on when you order and availability of parts.


Lights and Reflectors

In urban locations, where streets are usually well lit at night, you mainly need lights to alert drivers to your presence. I live and ride in such a location. The headlight that comes on the PCO does a pretty good job of lighting up the road so you can steer around the potholes, etc., and one of the three LEDs stays on for a few minutes when you come to a stop. The red taillight flashes as long as the bike is rolling, even if you're just walking the bike.

The headlight in older PCOs was mounted on the fender bolt on the fork. In the latest bikes, for some reason, they moved it up to the handlebars where it tends to light up the brake cables and casts their shadows on the road. It used to mount with the wires on the bottom side of the light, now the wires and rubber seals are on the top side. That doesn't seem like a good idea to me because it invites water to sit on the wire/seal. 


The headlight has 3 LEDs. When you are riding very slowly, like when you're climbing a steep hill, the lights flicker a lot. At more normal speeds they are on steadily. When you come to a stop, two of the LEDs shut off and one remains lit for a few minutes, powered by an internal supercapacitor.


The headlight wires run through a cable jacket to the top side of the light. You can see the power switch for the light and the cover for the USB port that can be used to charge accessories when the light is switched off.

When I was riding the old Cannondale, I covered a large portion of the frame and wheel rims with reflective tape. That made me more visible at night and covered the Cannondale logos to make the bike less attractive to thieves. I used a set of Cygolite HotRod lights to increase the chances I would be seen while I was on the streets at night. 

The frame of the PCO is painted matte black with reflective logos. It looks great, but it's not ideal for visibility, so I may add some reflective tape. Moving reflectors are more noticeable than fixed reflectors, so I added reflective tape to the wheel rims like the old Cannondale. The reflective tape I used is the same red and white stuff they put on truck trailers (look for "conspicuity tape DOT-C2"), so it lasts for years and is extremely efficient at reflecting light from every angle. It sticks fine to flat or concave surfaces, but don't try to bend it over a convex surface- the edges will peel up.

The tail light.  It flashes whenever the bike is rolling, even at walking speed. It is 59 cm (23") above the ground. The cable is routed on the underside of the fender. pardon the dirt, but this is a bike that gets ridden in weather.


The reflective Priority logo on the top tube of the frame is discrete in daylight but really stands out at night.


The wheels have 36 spokes so there are 36 spaces between them to add the tape. I cut a bunch of red and white reflective strips to fit (40 mm x 8mm), wiped the rims with isopropyl alcohol, then mounted the reflective stickers. I made one half of each wheel red and the other half white, figuring that as it rotates the color change will make it more noticeable. 


Red and white reflective tape added between the spokes on both wheels, and a big piece of red tape on the back of the rack. Yes, that's just reflected light!


Yes, reflectors work without any power source but the light that hits them!


Amazon sells these spoke mounted reflectors that look interesting, as well as a lot of different pre-cut reflective tape assortments in several different colors.

The bike comes with the legally required front and rear reflectors and one reflector for each wheel. I left off the red rear reflector in favor of a much larger piece of red reflective tape stuck to the back of the rack.


Brakes 

My bike came with Promax Solve hydraulic disc brakes. I haven't ridden a bike with hydraulic disc brakes before and was pleasantly surprised by the solid feel and stopping power. There's no flex or squishiness when you squeeze the brake levers - the bike just slows or stops. Braking is very smooth and predictable. It turns out there isn't much to adjust until the thing fails by leaking fluid, or you break a lever or bend a brake disc when the bike falls over or crashes.


Left side brake lever and grip. This lever controls the front brake. The grips are some high density foam that feels pretty good on bare hands. They're soft enough to provide some cushion but not squishy.


Right side brake lever, grip, and shifter. This lever controls the rear brake.


The rear Promax Solve brake caliper. The only adjustment is aligning the caliper with the brake disc which is done by loosening the mounting bolts, squeezing and holding the brake lever, then tightening the mounting bolts.

The front brake caliper mounts on the fork while the rear brake caliper mounts on the sliding dropout so that it remains aligned with the disc on the wheel even when the wheel is shifted backward to tension the drive belt.

Pedals

My bike came with Wellgo K79 B087 aluminum platform pedals that have studs cast right into the body. They have nicely sealed bearings that should be impervious to weather. I put a little anti-seize compound on them before I screwed them into the cranks so that I'll be able to get them off again if I ever need to.


One of the pedals. Plenty of cast-in studs to keep your feet from slipping. That flat area in the center is where the Welgo logo would go.


The markings indicate Wellgo K79 B087 pedals. They made of cast (?) aluminum, have sealed bearings, and yellow reflectors.


Belt Drive

The bike came with the Gates CDN belt drive system including a 50 tooth, 5-bolt, composite drive cog and a 24 tooth CDX steel rear cog,  model S-150 175 mm cranks, and a 118 tooth CDN center groove belt. There's a manual on the belt drive with the bike that says the CDN belt is good between -20 to +60C (-4F and 140F).  If you need wider temperature range, the CDX belt is rated for -53 to +85C (-65F to 185F). The rear wheel mounts have vertical dropouts that can slide in horizontal slots with adjusting screws that are used to tension the belt and align the wheel with the bike's frame. There's a complete technical manual that covers all the Gates Carbon Drive products here.


Gates has a phone app that can be used to check and adjust the belt tension. I tried it in my phone and found the belt's resonant frequency to be 58 Hz, a little higher than the recommended value indicating tension was a little too high, so I loosened up the belt a little until the app indicated a 45 Hz resonance.


The Gates web site has an excellent calculator that lets you figure out what the available gear ratios mean in terms of speed when riding. Here's an example I ran based on the hardware supplied on my bike:


I assume that the calculation takes the minimum and maximum gear ratios of the Enviolo hub into account when calculating speed vs cadence. Cadence between 30 and 80 seems like a reasonable range for my riding. I'm not a strong rider and probably can't maintain a cadence of 80 in a high gear unless I've got the wind at my back and/or going down hill. 30-60 is probably closer to my normal range.


Labeling on the drive belt. Yup, CDN, 118 teeth.


Gates 175 mm model S150 crankset with 50 tooth drive cog. This crank fits on a sealed bearing, square-axle bottom bracket, probably also made by Gates.


Tires

My bike came with WTB Slick 700 x 32C tires with very reflective side walls. They seem to reflect light very efficiently. I wonder if the reflective properties wear off from flexing and shedding glass beads. I wasn't able to find any info about that, just lots of ads for tires with reflective sidewalls.

If you want to swap in fatter tires, the frame and fork look like there's plenty of width, but the new tire has to fit under the fender. The fenders are 46 mm wide and supported by steel stays. As tire width increases, diameter also increases. While the frame and fork are wide enough for fatter tires, the vertical clearance under the fenders may limit the maximum tire width. The clearance looks sufficient for 37 mm wide tires. 

The tubes have Schrader valves.


This is the tire tread.  It rolls quietly.


Wheels

The wheel rims appear to be double wall aluminum, matte black like the rest of the bike, and have eyeletted spoke holes. Spokes appear to be painted black, and I noticed that paint is chipped at some spoke crossing points. Maybe that's why the tool kit came with touchup paint. Nipples are zinc/chrome (?) plated as are the eyelets. 

The front wheel has a built-in 6V, 3W generator (which implies 500 mA current output) that powers the head and tail lights. The rear wheel has the Enviolo hub. Both are set up for disc brakes with 160 mm discs. Wheels bolt to the fork and frame with standard 15mm nuts- no quick release. If you want to be able to repair flat tires on the road, you'd better carry a 15 mm wrench. 

Spokes are arranged in a triple cross pattern on the front wheel and a double cross pattern on the rear wheel. The double cross pattern on the rear wheel is necessitated by the large flange diameter of the Enviolo hub.


This is what the wheel rims look like. The sidewall of the tire is very reflective, as are the red and white bits of reflective tape I added to the center of the rims. Each wheel comes with a white reflector mounted on the spokes.


Front hub with built in dynamo. I hope it is well sealed against weather and especially salt incursion. I would think it would be best to install it with the connector at the bottom and then put a drip loop in the wire. The connector on the end of the wires is not sealed- maybe it should be.


The Enviolo hub is completely sealed- there are no ports to change "oil". It doesn't actually use oil- it uses a nonlinear fluid that solidifies under pressure between the balls and input and output rings inside the hub. Oil would probably be the last thing you want in there! The hub is 100% maintenance free.

You can get a look at the Owner's Manual for the Enviolo hub here, and the technical manual here. When I was looking at some troubleshooting info on their website, I saw something about rattling noises coming from the hub when coasting in low gear are normal. I have not heard any such noise, but maybe it's masked by the clicking of the freewheel. 

The Shifter


The shifter and grip.

Shifting from highest to lowest gear requires twisting the shifter about 280 degrees- not something you're likely to be able to do in a single twist. The hub doesn't care about whether you're pedaling, but when you're stopped, you can only shift through about 1/3 of the entire range (don't worry, it's enough). When the bike is rolling you can shift through the entire range, pedaling or not. When you're pedaling hard and shifting to a higher gear, you can feel some resistance in the shifter, but it shifts quickly and the resistance in the shifter disappears at the same time.

The gear display on the shifter is cute, but not really useful for an individual who owns the bike. Yes, it will show you the gear the bike is in when you start to use it, but it shifts so easily, you don't need to know where the gear is ahead of time- you'll know as soon as you push on the pedals. Or just get in the habit of twisting the gear shift to a lower gear every time you get on or off the bike. After the first 30 seconds of looking at the display while you shift, you won't need to look at it again. I suspect the indicator is there for fleet and rental bikes that will be ridden by people who are not accustomed to riding bicycles.


Seat and Post

The seat is a narrow but reasonably comfortable part with a central groove to relieve pressure on my soft parts. It might not be an ideal seat for women due to the narrow spacing of the pads. There doesn't appear to be any indication of the manufacturer or model of the seat marked on it, but the Priority Bikes web site says it is a "Velo Dual Density"

The seat post, for some reason, is made of carbon fiber tubing, but it isn't obvious to look at it, so it shouldn't attract thieves. It has a two-screw micro adjusting seat clamp that is very secure. The seat post is held in place with a screw-down clamp on the top of the frame's seat tube. If someone wants to steal the seat they'll need to bring a tool. I wouldn't put it past some thieves to do something like that, and you can buy special screws that have unique heads that require a key to unscrew them, but there are two more ordinary bolts holding the seat. So even if you secure the seat post with a special screw, they're going to take the seat. How many special keys do you want to carry around (and never lose)? If you're really worried about it, get a quick release clamp and take the seat and post with you when you lock the bike (but then they'll steal the clamp!).


The seat post and clamp.  You wouldn't know the post is CF to look at it.


It's nice looking and relatively comfortable at least for the rides I've done so far, up to about 20km.


Another one of those nice torque specs marked right where you need it.


I noticed that with the angle I have set the seat, there is a depression in its center that pools rain water. It might be nicer if the seat had a hole in the center to let it drain.


Fenders

The fenders are plastic, 46 mm wide, and painted matte black to match the rest of the bike and the hardware (stainless steel?) looks like that supplied with Planet Bike fenders of the type I installed on the old Cannondale. The rear fender has a red LED taillight and wire to the dynamo attached along its inside surface, out of sight, but right where crud from the road will be thrown against it. We'll see if the cable lasts...


Looks like a Planet Bike fender to me! It's got a nice Priority logo mud flap and ever a nice trim piece at the front edge of the fender.

Rack

I ordered the Axiom rack when I ordered the bike. It was shipped separately and arrived a day after the bike. I chose that rack because it is solidly built and the mounting system pushes the whole thing back a few cm to reduce the chance of your heels hitting panniers as you pedal.


The rack is made from 10.4 mm aluminum tubing, painted black like the bike. It's very sturdy, fits the bike perfectly, and holds panniers far enough back that you'll never hit the bags with your heels when you pedal. Some of the rivets visible on the fender are used to hold the wire for the tail light.


I also ordered a bag that was offered at a steep close-out discount from Timbuktu to go on the rack. It's a weatherproof convertible pannier/backpack that's big enough to carry my laptop computer and some other junk, but unfortunately, the attachment system doesn't fit the Axiom rack very well. It's less than optimal, but workable, so I'll keep using it. It beats the hell out of carrying the anything in a bag on my back!


The Kickstand

The kickstand deserves special mention. It is the beefiest kickstand I have ever seen on a bicycle! I think it would be right at home on a Harley-Davidson! It mounts on the left wheel stay with two screws, not immediately behind the bottom bracket as the Priority bike photos show. 

This is MUCH better!  If the kickstand were mounted in the usual place and in the usual way with a single bolt, would require kicking it up in order to roll the bike backwards otherwise the left crank arm would hit it. The single bolt would have a tendency to loosen and then the kickstand would keep pivoting on the bolt until you retightened it. When it's bolted to the wheel stay, it can't hit the crank arm, so you can roll the bike backwards without first kicking up the stand, and it can't pivot around the two mounting screws. 

I have managed to hit the kickstand with my heel while pedaling a couple times.

It has a big tough plastic/rubber foot that won't damage your floors if you park your bike inside your home.

That's what I call a kickstand!


The Frame

The frame is aluminum and  seems to be well made, with no attempt to smooth the welds at the joints. The old Cannondale frame had the welds ground smooth and it looked almost like it was molded as a single piece instead of welded. That's one reason why Cannondale bikes are as expensive as they tend to be. 

The rear brake tube (not cable- the brakes are hydraulic) is routed inside the top tube and the shifter cables and taillight wires are routed inside the down tube. The frame has some nice, welded-on brake cable guides on the left rear seat stay and the front fork.

Rear brake tube routing in the top tube of the frame


Rear brake tube mounting in the top tube of the frame.

There are screws to mount water bottle cages on the seat and down tubes, and attachment screws for racks on the rear dropouts and the front fork.

The paint is a beautiful matte black that appears to be skillfully applied and finished. There are reflective Priority logos on the top tube, belt and wheel stays, and the steerer tube. There are also two pieces of black reflective tape (yes, really) on the seat stays.

In order to mount the belt there has to be a cut in the frame because the belt is a continuous loop and has no pins you can pull out like a chain. The right side wheel mount/dropout is split and held together with two screws. If you ever need to replace the belt, you open the frame at that point, remove the old belt, put in the new one and screw it back together. 


Left side rear wheel mount. The brake caliper mounts on the dropout with the wheel axle, not the bike frame. When you adjust the belt tension by sliding the dropout back, the brake and wheel stay aligned to each other because they are mounted in the same piece of metal.


Right side rear wheel mount, annotated.  The actual dropout is a separate piece with a vertical slot that the axle fits into and is mounted behind the horizontal slot in the frame. It can slide in the slot, pushed back by the belt tension adjuster screw, and is then held in place with the two dropout fixing screws. You can see the split line in the frame that allows the belt to be replaced and the two bolts that hold it together.

Also because it is a belt drive, some provision has to be made to allow it to be tensioned. The rear wheel mounts use dropouts with vertical slots that the axle fits into. Those dropouts can slide in horizontal slots in the frame to allow the belt to be tensioned, and then they screw down tightly using the dropout fixing screws. The rear brake caliper mounts on the sliding dropout with the wheel so it stays aligned with the disc without being affected by belt tension adjustment.

It appears that all the hardware is stainless steel, and hopefully won't rust much if at all.


The serial number is stamped or milled into the frame, and appears on a  barcode sticker under the bottom bracket.


The Ride

I've been riding the bike for a couple weeks and find that the PCO is more comfortable than the Cannondale it replaced, and I love the shifter and brakes. The Enviolo hub is great- I'm no longer stuck in a slightly too high or too low gear, and I find myself changing the gear ratio much more often to exactly where I feel most comfortable pedaling. The low gear is plenty low to get me up the hills and the high gear gets me going as fast as I ever want to go. 

The only noise that the bike makes when pedaling is the tires on the road (as long and the lock isn't rattling). The belt drive and Enviolo hub are silent even when shifting. The freewheel clicks when you coast, of course. I've noticed that on particularly rough roads the kickstand rattles a bit.


Changes

The roads are in really bad shape here, so I may put the slightly fatter tires (Panaracer UrbanMax 700 x 35C) from the Cannondale bike on this one, and at least one bar-end mirror would be handy to see traffic approaching from behind. I had a split seat made by Serfas on the Cannondale that I liked, so I may swap seats.

There's no guard on the drive cog and I managed to catch my pants in it once.  As soon as I realized it I pedaled backwards and it let go- no harm done and no oil on my pants. I'll probably design and print a guard ring for the drive cog like I did for the Cannondale. 


Maintenance

No bike is completely maintenance free, but the PCO comes close. There's nothing to do with the sealed rear hub or the belt drive, which is most of the maintenance on most bikes, but the hydraulic disc brakes, lights, shifters, cables may require a little attention once in a while. The wheels and tires will be the main maintenance items- wheels may have to be trued occasionally after hitting potholes, and tires will have to be pumped up a bit every week or so, and flats repaired. Tires and brake shoes will wear out eventually. Overall, it's about as close to zero maintenance as you can get with a bicycle. Eventually the cogs and belt will wear out and require replacement, but they are supposed to last much longer than the chain drive parts they replace, so I don't anticipate having to replace any of them for many years.


Keeping It - Lock it up!

The bike doesn't come with a lock, of course, though you can buy one of a few sold by Priority. I used the same lock I've been using for a while- a Kryptonite Evolution Mini 7 with a companion cable. When I lock the bike, The U-lock goes through the frame and rear wheel and around the bike rack/post that I'm locking to, and the cable goes through the front wheel. I lock up on a rack in front of the clinic where I work and there's a lot of foot and car traffic, including frequent police drive-bys, so it's unlikely anyone will attempt to steal the bike while I'm at work. I can see the bike from the window of my operatory.

The Kryptonite lock comes with a bracket to mount on the bike's frame, but you still have to figure out how to carry the cable. I mounted the lock bracket on the down tube. When I was riding the Cannondale, I carried the cable on the seat post. It was convenient and easy because the seat post had quick release and when I went into work I took the seat and post with me to keep them from getting stolen. There's no quick release on the Priority seat post, so now I carry the cable in a pocket of the pannier bag. I noticed that the lock tends to rattle while I ride so I'm going to work out a way to prevent rattling when I carry the lock and cable on the bike without the bag. Maybe some Velcro tape?


This is how you lock a bike if you want to keep it. The U-lock goes through the frame and rear wheel and on the rack, and the cable gets looped through the front wheel. It would take considerable time and effort for a thief to make off with the bike, so they'll probably look for an easier target. If they have a cutoff wheel on a grinder they can cut the rack, throw the bike into a truck and work on the lock in a more private location at their leisure. If someone really wants it, they're going to get it.