Warning
This is a project I started to see if the Rino worm drive used in UMMD could be replaced with a lower cost alternative made using a printed gearbox and some cheap, sintered gears from China. The project was a failure, but I wrote all the stuff below as I worked on it, and there may be some value in that, so rather than ignore the whole thing, I'm posting it with this warning. If you're not interested in the process, skip to the bottom of the post to see what went wrong.
If you never fail, you never learn...
Belt driven Z axes offer some advantages over screw driven Z axes in 3D printers. Unlike very long or bent screws, they do not produce any lateral forces that can cause the bed to wobble and leave defects in the prints. Belts cost less than screws. Belt lifted Z axes can be made to any length needed, a benefit in tall printers.
There are two main reasons why belt lifted Z axes aren't more common in 3D printers. First, many people think that belt stretch may degrade print accuracy. Second, a belt lifted Z axis requires some means to prevent the bed from dropping like a rock when power to the Z axis motor is cut.
Both of those concerns were addressed in the design of Ultra MegaMax Dominator (UMMD), my coreXY printer that includes a belt lifted Z axis. After construction, belt stretch was measured at 42 um/kg print mass (using 10 mm wide steel core belts) and its effect on print accuracy calculated. The conclusion: belt stretch is inconsequential. The bed-drop on power-off problem was solved using an industrial surplus OnDrives Rino 30:1 worm gear reducer. It works perfectly, though I made an poor choice in the drive pulleys. More on that later.
The only problem with the belt lifted Z axis in UMMD was the cost of using the Rino worm gear reducer. That part, including NEMA-23 motor (overkill for lifting the bed in a 3D printer), and keyed 8mm shaft cost $138 all-in. It's an elegant solution to the bed drop problem, but Ouch!
This post is about a less expensive way to make a worm gear drive. The new design duplicates and even improves on the function of the Rino for about $40 which includes the cost of the gears, bearings, shaft, and motor.
If you never fail, you never learn...
Intro
Belt driven Z axes offer some advantages over screw driven Z axes in 3D printers. Unlike very long or bent screws, they do not produce any lateral forces that can cause the bed to wobble and leave defects in the prints. Belts cost less than screws. Belt lifted Z axes can be made to any length needed, a benefit in tall printers.
There are two main reasons why belt lifted Z axes aren't more common in 3D printers. First, many people think that belt stretch may degrade print accuracy. Second, a belt lifted Z axis requires some means to prevent the bed from dropping like a rock when power to the Z axis motor is cut.
Both of those concerns were addressed in the design of Ultra MegaMax Dominator (UMMD), my coreXY printer that includes a belt lifted Z axis. After construction, belt stretch was measured at 42 um/kg print mass (using 10 mm wide steel core belts) and its effect on print accuracy calculated. The conclusion: belt stretch is inconsequential. The bed-drop on power-off problem was solved using an industrial surplus OnDrives Rino 30:1 worm gear reducer. It works perfectly, though I made an poor choice in the drive pulleys. More on that later.
The only problem with the belt lifted Z axis in UMMD was the cost of using the Rino worm gear reducer. That part, including NEMA-23 motor (overkill for lifting the bed in a 3D printer), and keyed 8mm shaft cost $138 all-in. It's an elegant solution to the bed drop problem, but Ouch!
This post is about a less expensive way to make a worm gear drive. The new design duplicates and even improves on the function of the Rino for about $40 which includes the cost of the gears, bearings, shaft, and motor.
Parts Selection
I considered the following when selecting the parts to use:
1) NEMA-17 motor, common and cheap
2) use common bearings and shafts
3) gear ratio of 30-1 or higher to ensure adequate full-step resolution and lifting force
4) gears fit motor and shafts without couplers
5) use common pulleys and belts
6) full step resolution of 50-100 steps/mm
Motor:
In UMMD, the motor supplied with the Rino worm drive was rated for 164 oz-in holding torque at 1.8A. It operates at 1A in UMMD, so the actual holding torque is probably a little less than 100 oz-in, yet it is more than enough to lift the 3.5 kg bed and support assembly plus 4 kg of print mass and run it up and down at 20 mm/sec.
NEMA-17 motors rated up to 100 oz-in are readily available, and they are smaller and usually cheaper than NEMA-23 motors, so I chose to design the worm gear mechanism to use a NEMA-17 motor.
NEMA-17 motors normally have 5 mm diameter shafts, so I needed to find a worm gear set that had a 5 mm bore worm gear so that it wouldn't need any adapters or shaft couplers.
I used a 42BYGH610, 40 mm long, 200 step/rev, 1.2A, NEMA-17 motor that I had in my parts collection- it doesn't take a big motor to lift a few kgs. That motor is rated for 3 kg cm (about 42 oz-in) holding torque. The 40:1 gears will multiply that torque up to about 120 kg cm. That sounds impressive, but torque drops off with speed and current, and the motor is going to have to run fast to move the bed at a reasonable speed.
I used a 42BYGH610, 40 mm long, 200 step/rev, 1.2A, NEMA-17 motor that I had in my parts collection- it doesn't take a big motor to lift a few kgs. That motor is rated for 3 kg cm (about 42 oz-in) holding torque. The 40:1 gears will multiply that torque up to about 120 kg cm. That sounds impressive, but torque drops off with speed and current, and the motor is going to have to run fast to move the bed at a reasonable speed.
 |
| Torque curve from the motor's data sheet. PPS in the X axis is equivalent to full steps (?), so divide by 200 to get revs/sec. |
Shaft:
The Rino used an 8 mm keyed shaft. The 8 mm part was fine- it is commonly used in 3D printers anyway, and as a result, there are a lot of bearings and pulleys with 8 mm bore readily available, but the key had to go. The disc gear needed to have an 8 mm bore and use set screws to hold it on the shaft.
Gears:
Basic gear specs to be met: 5 mm bore worm gear, 8 mm bore disc gear, both gears had to use set screws (no keys!), and a gear ratio of at least 30:1 to ensure adequate resolution and lifting power. After digging through the worm gear set listings on ali-express, I found a 40:1 set that had the requisite 5 mm bore worm gear and 8 mm bore disc gear, both with grub screws for easy attachment to a 5 mm motor shaft and 8 mm unkeyed output shaft.
Bearings
UMMD used 8 mm self-aligning pillow blocks at the ends of the output shaft. There was no reason to use anything different, so I used the same parts. I also needed some 8 mm bearings for the gearbox, so I used F608zz bearings like the ones I used in UMMD's XY stage to make the pulleys. The flanges keep the bearings in position inside the gearbox- more on that later.
Belt
UMMD used 3 mm pitch HTD 3M belt, but 2 mm pitch GT2 belt is more common, as are the pulleys for it, so this system is designed to use GT2 belt, either steel or glass core. Of course it can easily be switched to any other belt pitch simply by changing the pulleys. I prefer to use 9-10 mm wide belt as it will stretch less than 6 mm belt under the same load, and doesn't cost much more. Pulleys for either width are readily available.
Pulleys
Using 2 mm pitch GT2 belts means 2 mm pitch GT2 drive pulleys, and they need 8 mm bore to fit the 8 mm output shaft from the gearbox. See below for the calculations for the number of teeth. The flanged pulleys at the top of the Z axis are made from pairs of F608zz bearings mounted on flat plates with shoulder screws for axles.
The combo of motor steps per rev, gear reduction ratio, belt pitch, and pulley teeth determine the full step resolution of the Z axis. Having full-step resolution equal to a nice, round number avoids math errors in the controller and current errors in the motor driver chip that can lead to Z axis print defects as well as making print layer thickness selection convenient. I used a typical 200 step/rev motor, 40:1 gear reduction, so now I had to figure out how many teeth the pulleys should have to get a good full step resolution value for the drive.
UMMD used a 200 step per rev motor, 16:1 ustepping, a 30:1 gear reduction drive, 3mm pitch belt and 36 tooth pulleys. That was an unfortunate choice for the pulley, (see redux in column 3), because it resulted in full step resolution at 0.018 mm intervals. This spreadsheet calculates the full and microstep resolution of belt lifted Z axes and the full step layer thicknesses available.
Notice the nice 0.01 mm full step resolution in the 4th column. That means any multiple of 0.01 mm can be used for print layer thickness. Compare that to column 2, the original UMMD Z-axis set-up. The switch to 40:1 gears and 2 mm pitch belt is a big improvement.
Imperfect gears will lead to periodic print defects. If the disc gear is imperfect, print flaws will show up and repeat at 80 mm intervals. If the worm gear is imperfect, repetitive print flaws will show up at 2 mm intervals. See photos of test prints below...
Potential sources of error
Imperfect gears will lead to periodic print defects. If the disc gear is imperfect, print flaws will show up and repeat at 80 mm intervals. If the worm gear is imperfect, repetitive print flaws will show up at 2 mm intervals. See photos of test prints below...
Gearbox Design
The whole Z axis is going to consist of the gearbox, output shaft, and pulley(s), plus the frame and guide rails/linear guides, and bed (or X axis) support assembly. The belt(s) will have to be in a position that allows a clamp attached to the linear bearing block(s) to grab it.
When designing something like this, a good place to start is by making 3D models of all the hardware and assemble them in CAD, then design the box to hold them.
There are some critical dimensions and relationships that have to be maintained in the final printed part(s). For example, the F608zz (or RF2280HH) bearings are going to have to be accurately aligned on the same axis and they have to fit into holes in the printed plastic. The distance between the flanges is:
Other critical dimensions include the spacing between the two gears which translates to the spacing between the motor shaft and the output shaft, and the motor hole spacing.
The first thing I did when I received the gears was make measurements to confirm their dimensions. Surprise! The gears didn't match the drawings on the ali-express order page. I made models of the gears that were shipped, and drawings with critical dimensions from the model. Here is the dimensioned worm gear drawing and here is the disc gear drawing.
The ideal axle center to axle center spacing is 29 mm. One of my early prototypes used 29 mm spacing and when I assembled everything, the gears were binding, so I moved them apart a little in the next couple prototypes. The final design spaces them at 29.35 mm apart which allows for a tiny bit of rotational play (I can hear a click but the movement is so small I can't see or feel it). The rotational play won't matter in operation because the mass of the bed assembly will keep the gears fully engaged on one side at all times. There should be no backlash.
The next step is to design a printable box to enclose the gears and bearings while maintaining those critical relationships.
When you design a printed part that is going to be subjected to mechanical force such as belt tension, if you don't want it to flex much you have to keep the plastic bulky. For example, a lot of designs for 3D printed motor mounts use plastic shaped like L brackets, sometimes with a little reinforcing webbing (examples: https://www.thingiverse.com/thing:715526 and https://www.thingiverse.com/thing:175413). That sort of thing might be rigid enough if it's made of steel or even aluminum, but plastic? As soon as you apply belt tension, the mount is going to flex/twist. I prefer to print such parts thick and heavy so they won't flex (as much). I think of the design in terms of starting from a solid block and removing as little plastic as possible to accommodate the other parts.
I used the green type design technique for this gearbox. I started with a solid block of plastic and removed just enough material to accommodate the parts that have to fit inside or attach to it.
If the print has the holes for the bearings printed in the vertical walls, the outer surface of the holes will be made of stacked layers, and will be rough, especially at the top and bottom, because of the nature of 3D printing in layers. That's going to make it hard to ensure that the bearings will be accurately aligned with each other. It is better to print the holes for the bearings flat on the printer's bed.
 |
| UMMD's Z axis with the Rino worm drive assembly at the bottom of the Z axis and two belts lifting the bed assembly. Other configurations, including lifting the X axis in an i3 type printer, are possible using a similar setup, probably inverted. |
When designing something like this, a good place to start is by making 3D models of all the hardware and assemble them in CAD, then design the box to hold them.
 |
| These are the mechanical parts that are not printed, excluding screws to fasten things together. There are two, 1.5 mm thick nylon washers between the F608zz bearings and the disc gear that are not visible. |
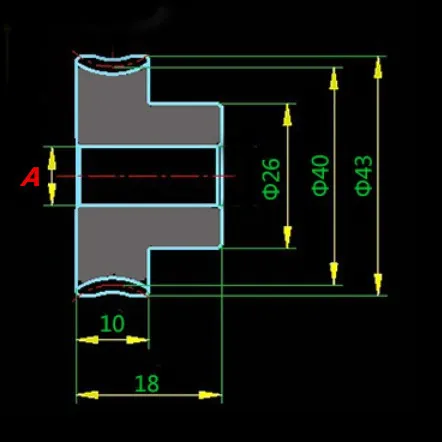 |
| This is the disc gear drawing from the aliexpress page, with 8mm bore and 20 mm distance from the center of the bore to the worm gear contact point. Unfortunately, the gear I received does not match this drawing! |
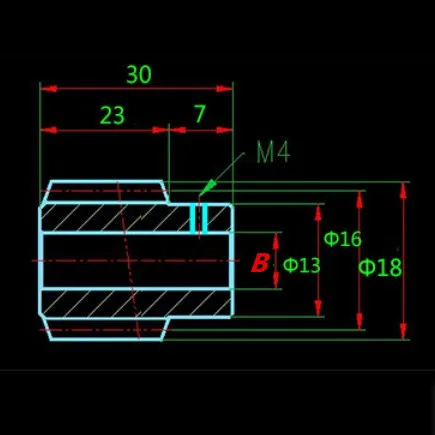 |
| Mislabeled worm gear drawing- the text says bore is 5 mm, not 13 mm, and the pitch diameter is 16 mm, so it's 8mm from the center of the bore to the disc gear contact point. The gear I received did not match this drawing. |
The first thing I did when I received the gears was make measurements to confirm their dimensions. Surprise! The gears didn't match the drawings on the ali-express order page. I made models of the gears that were shipped, and drawings with critical dimensions from the model. Here is the dimensioned worm gear drawing and here is the disc gear drawing.
The ideal axle center to axle center spacing is 29 mm. One of my early prototypes used 29 mm spacing and when I assembled everything, the gears were binding, so I moved them apart a little in the next couple prototypes. The final design spaces them at 29.35 mm apart which allows for a tiny bit of rotational play (I can hear a click but the movement is so small I can't see or feel it). The rotational play won't matter in operation because the mass of the bed assembly will keep the gears fully engaged on one side at all times. There should be no backlash.
The next step is to design a printable box to enclose the gears and bearings while maintaining those critical relationships.
When you design a printed part that is going to be subjected to mechanical force such as belt tension, if you don't want it to flex much you have to keep the plastic bulky. For example, a lot of designs for 3D printed motor mounts use plastic shaped like L brackets, sometimes with a little reinforcing webbing (examples: https://www.thingiverse.com/thing:715526 and https://www.thingiverse.com/thing:175413). That sort of thing might be rigid enough if it's made of steel or even aluminum, but plastic? As soon as you apply belt tension, the mount is going to flex/twist. I prefer to print such parts thick and heavy so they won't flex (as much). I think of the design in terms of starting from a solid block and removing as little plastic as possible to accommodate the other parts.
 |
| Two styles of printed plastic motor mount. Which do you think will flex more when belt tension is applied? |
If the print has the holes for the bearings printed in the vertical walls, the outer surface of the holes will be made of stacked layers, and will be rough, especially at the top and bottom, because of the nature of 3D printing in layers. That's going to make it hard to ensure that the bearings will be accurately aligned with each other. It is better to print the holes for the bearings flat on the printer's bed.
 |
| Early prototype gearbox printed as a single piece with holes for bearings in vertical walls. Note rough areas at top (and not visible, bottom) of the bearing mounting hole |
 |
| Bearing inserted into hole. Will it line up with the bearing on the other side of the box? Maybe... |
 | |
|
 |
| Bearing inserted into mounting hole. Will it line up with the bearing on the other side? Sure! |
I made a prototype using a single printed piece (the red one in the photos, above) but it had a couple problems. The bearing holes that require critical alignment were "iffy" because of the way the print layers stack and the rough surfaces at the bottom and top of the holes. It would also be difficult to assemble because of the tight space for mounting the bearings, washers, and disc gear.
The next couple prototypes were made in two pieces with the bearing mounting holes printed flat on the bed. I added bosses to align the two sides of the box and ensure alignment of the gears and bearings when the part was assembled. The bosses surround the screws that hold the halves of the box together. When you design two parts to be screwed together like this, the piece where the screw will be inserted will have a loose fit hole for the screw and the other piece will be a tight fit where the screw will roll its threads into the plastic. The boss will go on the part where the screws are inserted and the receptacle will go on the part into which that the screw will cut threads. If you do it the other way, when you drive in the screw, the relatively thin plastic boss is liable to break off.
 |
| Bosses (the collar surrounding the screw) in one half of the gearbox align it with the other half that has matching receptacles. |
 |
| The screw hole in the boss allows the screw to pass freely. The hole in the receptacle gets grabbed by the screw's threads. Don't do it the other way- the boss will break off when the screw starts grabbing it. |
When designing prints to fit real world parts like bearings, you have to account for the smaller printed hole sizes that FDM printing produces. In my printer, experience has taught me to make holes 0.35 mm larger than the object that has to fit into the hole, so for example, the bearings are 22 mm in diameter so I designed the printed gearbox with 22.35 mm diameter holes. The bearings fit into the printed box halves tightly.
 |
| Assembly- put the worm on the motor shaft, and put the disc gear, bearings, and washers on the 8mm output shaft- don't forget to put Lock-Tite on the set screws! Screw the "A" side (on the left) of the box to the motor, insert the output shaft assembly, put the "B" side of the box (right) on the shaft and screw it to the motor, then screw the two halves of the box together. |
The two piece gearbox was a much easier to assemble option, but you have to follow a specific sequence because the over-sized disc gear mounting collar interferes with tool access to mount the motor.
The design of the Z axis, and dimensions of common frame materials have to be considered when figuring out how to mount the gearbox.
The design above is a generic design that is intended for putting into new printer designs. I wanted to test the performance of the gearbox and thought about how to build up a test jig and came to the conclusion that the easiest thing to do would be to replace the Rino in UMMD and test it in the printer, so I designed modified the generic version to be an almost drop-in replacement for the Rino. I also switched to GT2 belt and since the drive pulley diameter changed I had to reprint the spacers for the pillow blocks and the belt clamps. After all that, I installed it and ran some tests.
The first test was just to see if it could handle the same sort of load the Rino had been able to lift, so after tweaking the firmware for 1600 usteps/mm and reducing the speed to 10 mm/sec (it stalled at 20 mm/sec), I checked the lifting capability and belt stretch:
First test of printed worm gear box in UMMD from Mark Rehorst on Vimeo.
The design of the Z axis, and dimensions of common frame materials have to be considered when figuring out how to mount the gearbox.
 |
| Fusion360 sure can do some nice rendering... |
 |
| This is the "A" side of the gearbox that gets screwed to the motor as a second assembly step (after first mounting the worm gear on the motor shaft). |
 |
| The "B" side of the gearbox, on the right, gets mounted after the bearings, shaft, disc gear and washers are put in place. Once the whole thing is assembled you can bolt it to the t-slot using a single bolt. |
Performance tests
The design above is a generic design that is intended for putting into new printer designs. I wanted to test the performance of the gearbox and thought about how to build up a test jig and came to the conclusion that the easiest thing to do would be to replace the Rino in UMMD and test it in the printer, so I designed modified the generic version to be an almost drop-in replacement for the Rino. I also switched to GT2 belt and since the drive pulley diameter changed I had to reprint the spacers for the pillow blocks and the belt clamps. After all that, I installed it and ran some tests.
The first test was just to see if it could handle the same sort of load the Rino had been able to lift, so after tweaking the firmware for 1600 usteps/mm and reducing the speed to 10 mm/sec (it stalled at 20 mm/sec), I checked the lifting capability and belt stretch:
First test of printed worm gear box in UMMD from Mark Rehorst on Vimeo.
 |
| Belt stretch test prep: the gauge is bolted to the printer's frame and zeroed on the bed. |
 |
| 1.25 kg load, about 50 um stretch. |
 | |
|
 |
| 3.75 kg load- about 210 um stretch |
This video shows some stretch and precision/accuracy tests:
UMMD 40:1 worm drive precision testing and belt stretch under load from Mark Rehorst on Vimeo.
Notice that when I moved the Z axis in 1 mm steps every other number looked about right while those in between were a little off. Hmmmmm...
UMMD 40:1 worm drive precision testing and belt stretch under load from Mark Rehorst on Vimeo.
Notice that when I moved the Z axis in 1 mm steps every other number looked about right while those in between were a little off. Hmmmmm...
Print test
I prepared a test print to see how well the new Z axis drive would work. I printed in 100 um layers and this was the result: | |
|
 |
| A closer look at the layers and the bulging. The bulges repeat every 2 mm. The worm gear rotates once for every 2 mm of Z axis motion, so there seems to be a problem with the worm gear. The disc gear rotates once for every 80 mm of Z axis motion, so a much taller print would reveal any defects in the disc gear. |
 |
| 165 mm tall print in 0.25 mm layers. I don't see any artifacts that repeat at 80 mm intervals, and the 2mm ribbing is a little better than the 0.1 mm layer print, but still not good. |
Error
The worm gear rotates once for every 2 mm of Z axis movement, so the banding points to the worm gear as the source of error. The error may be in the tooth surface in which a divot will cause the disc gear to not rotate as much as it should resulting in smaller Z displacement. Or it could be the bore of the worm gear is off-center.I stepped the Z axis in 0.1 mm steps, recorded and plotted the error:

A single tooth of the worm gear engages the disc gear, so it may be that shifting the worm gear along the motor shaft would allow one to find a tooth that is better (or they might be worse).
Conclusion
These particular gears provide a great way to increase motor lifting power but they are just not good enough for the micron level positioning needed in a printer's Z axis, unless you're going to print in very thick layers. Other gears are available, and I may revisit this topic at some time in the future if I run into a source of inexpensive, high quality gears. In the meantime, I put the Rino back into the printer but changed to 40 tooth pulleys on the 3 mm pitch belt, yielding resolution of 50 full steps per mm. Changing the pulleys required a change to the belt clamp design and the upper pulley plates.
Can you calibrate the error out with your ustep resolution? Probably would need an additional sensor to know your worm location at all times?
ReplyDeleteIn theory, I could measure the error as I have done and write a post-processing script to run on the the gcode file that would bump all Z axis movements by the error amount based on where it is in that 2 mm repetitive cycle.
DeleteThis kind of problem has existed for a very long time in the worm gears used for telescope positioning, since non-linearities in the worm gear's travel per rotation will show up as a speeding-up and slowing-down of the telescope's travel over very small distances. When tracking stars at high magnification, this is ruinous to long exposure photography. Two techniques have been used to deal with it when resorting to very expensive high-precision gearing is out of budget: First, Periodic Error Correction (or "PEC"), in which the actual travel of the worm gear is plotted, as you have, and this is stored in system firmware as a correction table, such that the rotation of the worm is sped up/slowed down by an offsetting amount at the appropriate points in the curve so as to flatten out the travel profile as the scope corrects for the Earth's rotation. The system just needs to understand where in the rotation profile the worm is at any given location. This can make a huge difference, and make an otherwise unusable worm far more accurate without an increase in cost. The Meade prosumer grade scopes (LX200 series) use this technique. The other technique is more common because it's generic to the specific mechanics, and is known as autoguiding. In this technique, the user focuses the telescope on the desired point, and then a secondary CCD camera chooses a secondary suitably bright "guide star" in its field of view, and issues real-time corrections to the drive motors as the guide star appears to "wobble" due to any inaccuracies in the drive train. The correction capability in this kind of technique is limited only by the pixel resolution of the camera relative to the optics, and its ability to distinguish when the guide star has perceptibly moved from the desired location.
ReplyDeleteThe first technique sounds entirely usable for 3D printing with suitable firmware modification, but the second technique less so due to its reliance on precision optics and the fact that the telescope is trying to remain focused on a fixed point as the earth moves under it.
I hadn't thought about the telescope problem, but it makes perfect sense. If I were a coder I might try to get into the controller's firmware source code and modify it to read a table to bump the Z values. Two other places to make such corrections would be in the slicer, or post-process the gcode. Unfortunately, I am not a coder, and there aren't many people interested in doing this type of Z axis who can also do the necessary coding. Maybe someday...
DeleteWould a globoid worm gear solve the problem?
ReplyDeleteGloboid gears are intended to increase the contact area between the gears to reduce wear. That isn't the problem here. he problem is the quality of the gears, not the shape of the teeth.
DeleteHi Mark, I'm in building a smaller version of your UMMD, about 2/3 of UMMD's size. The idea of the belt-driven z-axis impressed me, but it would make things much easier if I had the stl's of the worm gear box (btw, I ordered exactly the components you mentioned above ;-) ). Do you think you can publish the gearbox stl's?
ReplyDeleteThanks in advance
Hermann
I will add a link to the models for the yellow gearbox in the test, above. It probably won't do much good unless you come up with some way to correct the positioning errors caused by the gears.
DeleteI recently saw that someone had made a belt lifted Z axis using this gear set: https://www.ebay.com/itm/1M-20T-B5-1T-B5-Worm-Gear-1-Module-90-Angle-Set-Kit-Ratio-20-1-Wheelbase-18mm/262744570681 . It looks like they are better quality gears based on photos of the prints I saw- there were no visible Z axis artifacts. Unfortunately, both gears have 5 mm bore. It shouldn't be too hard to bore out the disc gear for an 8mm shaft.
Is there much clearance between the worm gear bore ID and the shaft OD?
ReplyDeleteA setscrew mount isn't as concentric as a press fit.
It seems pretty tight, but it is possible that that is the cause of the problem with the print.
DeleteHi Mark, I am impressed about your 3D printer. I have the intention to start building one.
ReplyDeleteWell, get to it! You know what they say: "The road to hell is paved with good intentions!"
DeleteHi Mark, First of all thank you for your effort to put all data here. I designed the same z axis worm gear-pulley concept and failed as same as you do. My ratio was worse 49:1. I should have read your blog first :). I spend many hours to find the issue. I tried, bed pıd, prints at different temps, different speeds, different microstepping. None of them worked. Only layer height helped little bit. I machined gears by myself with a hobby lathe. Of course gear was not at the center as it should be. If I move my z axis 0,1mm step by step my readings are like so ; 1.4, 1.4, 1.2, 1, 0.8, 0.7, 0.7. I'm going back to lead screw...
ReplyDeleteOr just get a motor with a better gearbox. Someone at the makerspace used one of these to lift the bed using belts in his printer and it prints as well as any I have ever seen.
Deletehttps://www.ebay.com/itm/324001642095?hash=item4b7000b66f:g:gvQAAOSwTh1d50kE
Hello
ReplyDeleteHow can i get stl of ur worm gear?
Im really wonna do same project
So sorry, but this was done 6 years ago. I no longer have the stl or even the original CAD files. Unless you had the same set of gears I used it probably wouldn't do you any good. Time for you to learn CAD!
Delete